Coverage Rounding Report
The Coverage Rounding report returns a list of all clients that have a particular line of business with and / or without the support of any one or more other line of business while targeting those clients as prospects for cross-selling or account rounding opportunities.
To Generate a Coverage Rounding Report
- On the Primary menu, click REPORTS.
- On the REPORTS menu, click Reports. The Nexsure Reports dialog box is displayed.
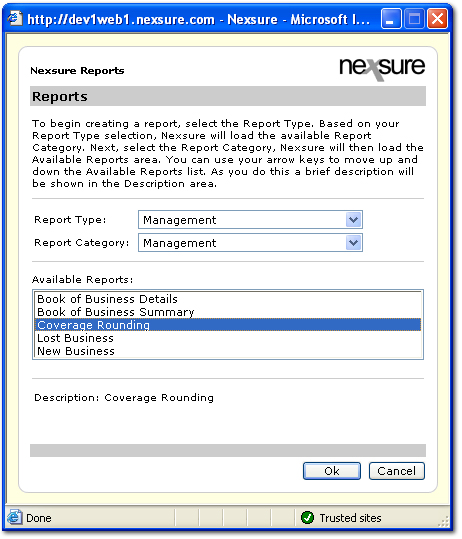
- In the Report Type list, select Management.
- In the Report Category list, select Management.
- In the Available Reports list, select Coverage Rounding.
- Click OK. The summary tab is displayed.
- On the navigation toolbar, click New Report Criteria to go to the Nexsure Reports > Report Criteria dialog box.
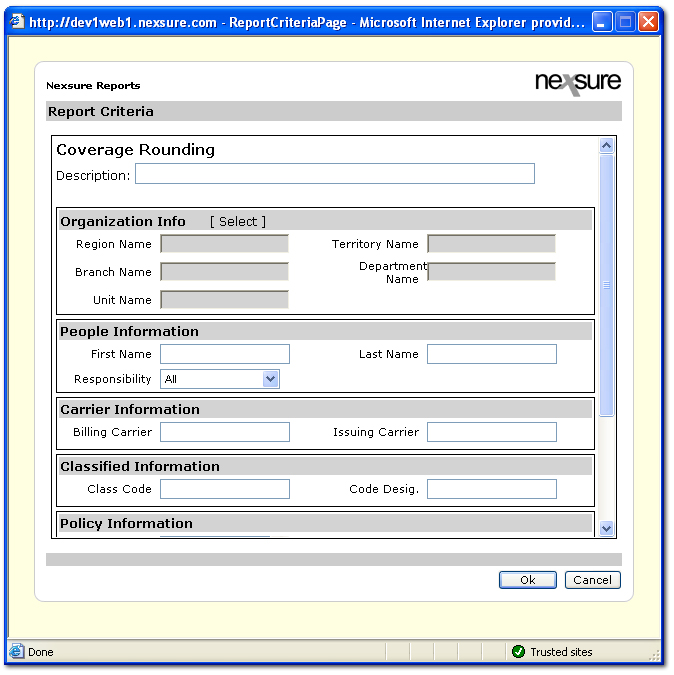
- In the Description box, enter a description for the report.
- Under Organization Information, click [Select]. The Nexsure Organization Criteria dialog box is displayed.
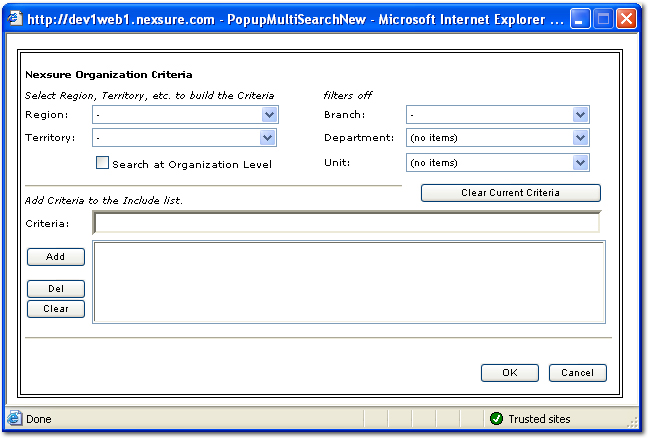
- In the Nexsure Organization Criteria dialog box, select the desired organization information (in the Region,
Territory, Branch, Department, and Unit lists) to query for the report
and click Add.
Note: If the report is being run for the entire organization it is not necessary to make a selection in the Nexsure Organization Criteria dialog box. Only one Region, Territory, or Branch may be selected for each report. When filtering by Department or Unit, add the Branch first then add the Department or Unit.
Once
information has been added to the Include list, it can be removed by selecting
the item and clicking Del to remove individual items or Clear to remove all
items.
- If
the organization information is correct, click OK. The organization information selected is added to the Nexsure Reports > Report Criteria screen.
- In the People Information area, the following are available:

- In the First Name and Last Name boxes, enter the name of the staff member (exactly as it is entered in Nexsure) that is the primary assigned to the clients to be captured on the report.
- In the Responsibility list, select the responsibility of the staff member. The selections are based on the responsibilities set up in the organization.
- In the Carrier Information area, enter the billing or issuing carrier name. The exact name of the billing or issuing carrier must be used. Use the Issuing Carrier to find out where business is being placed. Use the Billing Carrier to find the volume of premium with a particular carrier.

- In the Classified Information area, enter the Class Code or the Code Designation.

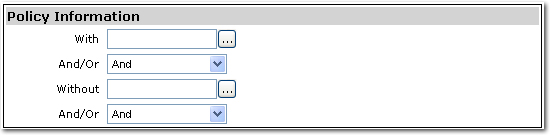
- In the Policy Information area, a Boolean type string can be set up to include or exclude lines of business. To set up the string, make selections in the following:
- With: Click the Ellipsis
 button and select a line of business to include in the report.
- And / Or: Select the AND or the OR
 Boolean operator to be used if multiple LOBs have been selected in the With box above.
Boolean operators:
AND: Narrow search and retrieve records containing all of the LOBs that have been selected.
OR: Broaden search and retrieve records containing any of the LOBs that have been selected.
- Without: Click the Ellipsis button and select a line of business to exclude in the report.
- And / Or: Select the AND or the Or Boolean operator to be used if multiple LOB's have been selected in the Without box above.
- In the Report Format Options area, select one of the options in the Format Type list.
- PDF: This is the default setting that creates the report in a PDF format. The report data is
static and cannot be manipulated.
- XLS: Microsoft® Excel® document that can be
manipulated as an .xls file. The report is generated with the same
formatting used in the PDF format so cells are merged and data may
not be stored in individual cells.
- DOC: Microsoft® Word® document that can be
manipulated as a .doc file.
- XLS (unformatted): Microsoft Excel document
that can be manipulated as an .xls file. The report is generated with no
formatting so cells are not merged and data is stored in individual
cells, however column headers do not appear and page breaks are
not inserted.

- In the Nexsure Reports > Report Criteria dialog box, click OK. The Coverage Rounding report will start compiling.

- To update the compiling status, click Refresh on the navigation toolbar.
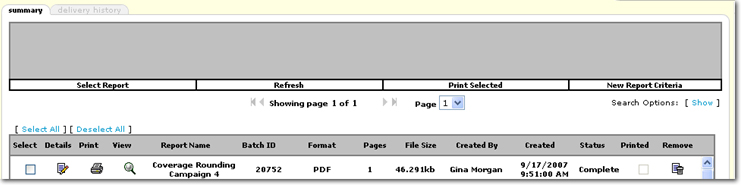
- Once the report Status is Complete, click the View
 icon to view the report. The Details
  icon can be clicked to view and edit the criteria of the report. Use the results of the report to create a campaign. See the Campaign Wizard topic for more information.
Note: When setting up the Coverage Rounding report for a campaign, be sure to select an LOB that is associated with the appropriate document template for the campaign. Otherwise, no campaign documents will be available for selection when setting up the campaign.
Campaign Wizard
Campaign Management